Showing posts with label Daring Bakers. Show all posts

March 27, 2010

Daring Bakers - Grapefruit Tian with Vanilla Bean Grapefruit Marmalade

I don't usually make a dessert solely for me... but selfishly, for this challenge I couldn't resist. I wanted to make a Grapefruit version of the Orange Tian recipe we were given to use and am happy I did. All morning I nibbled on extra segments of grapefruit, and consumed way too much juice, but it made me happy and what could be better than a happy baker?

The 2010 March Daring Baker’s challenge was hosted by Jennifer of Chocolate Shavings. She chose Orange Tian as the challenge for this month, a dessert based on a recipe from Alain Ducasse’s Cooking School in Paris.

There are a lot of steps to this dessert - even though the final product is fairly simple. A Tian is a layered dish, it can be savory or sweet, but most commonly it is made with vegetables. I chose grapefruit instead of orange because I like it more. I wanted to experiment with the marmalade, so I did some research and decided Vanilla Bean would pair well. I like the way it turned out - a little bitter - a little vanilla-y but mostly good.

The Tian is built with a layer of Pate Sablee (similar to a sweet pastry dough), a layer of marmalade, a thick layer of whipped cream with a little marmalade mixed in, and a layer of fresh fruit. The fruit was supposed to be covered in a caramel made with fruit juice, but I decided to use it only on the top. I may not make this again assembled as a dessert, but combining the marmalade with multiple ingredients is a great idea that I will try again. At least it is pretty and pink.

Here is the recipe if you want to try it... I recommend multiple days of preparation.

For the Pate Sablee:

Ingredients U.S. Imperial Metric Instructions for Ingredients 2 medium-sized egg yolks at room temperature granulated sugar 6 tablespoons + 1 teaspoon; 2.8 oz; 80 grams vanilla extract ½ teaspoon Unsalted butter ¼ cup + 3 tablespoons; 3.5 oz; 100 grams ice cold, cubed Salt 1/3 teaspoon; 2 grams All-purpose flour 1.5 cup + 2 tablespoons; 7 oz; 200 grams baking powder 1 teaspoon ; 4 grams

Directions: Put the flour, baking powder, ice cold cubed butter and salt in a food processor fitted with a steel blade.

In a separate bowl, add the eggs yolks, vanilla extract and sugar and beat with a whisk until the mixture is pale. Pour the egg mixture in the food processor.

Process until the dough just comes together. If you find that the dough is still a little too crumbly to come together, add a couple drops of water and process again to form a homogenous ball of dough. Form into a disc, cover with plastic wrap and leave to rest in the fridge for 30 minutes. Preheat your oven to 350 degree Fahrenheit.

Roll out the dough onto a lightly floured surface until you obtain a ¼ inch thick circle.

Using your cookie cutter, cut out circles of dough and place on a parchment (or silicone) lined baking sheet. Bake for 20 minutes or until the circles of dough are just golden.

For the Marmalade:

Ingredients U.S. Imperial Metric Instructions for Ingredients Freshly pressed orange juice ¼ cup + 3 tablespoons; 3.5 oz; 100 grams 1 large orange used to make orange slices cold water to cook the orange slices pectin 5 grams granulated sugar: use the same weight as the weight of orange slices once they are cooked

Finely slice the orange. Place the orange slices in a medium-sized pot filled with cold water. Simmer for about 10 minutes, discard the water, re-fill with cold water and blanch the oranges for another 10 minutes.

Blanch the orange slices 3 times. This process removes the bitterness from the orange peel, so it is essential to use a new batch of cold water every time when you blanch the slices.

Once blanched 3 times, drain the slices and let them cool.

Once they are cool enough to handle, finely mince them (using a knife or a food processor).

Weigh the slices and use the same amount of granulated sugar . If you don’t have a scale, you can place the slices in a cup measurer and use the same amount of sugar.

In a pot over medium heat, add the minced orange slices, the sugar you just weighed, the orange juice and the pectin. Cook until the mixture reaches a jam consistency (10-15 minutes).

Transfer to a bowl, cover with plastic wrap and put in the fridge.

I added the seeds of half a vanilla bean and used 1/3 honey instead of all sugar. You can adjust the sweetness of the marmalade as you go, just make sure to bring it to a boil before you add anything, then lower the heat to maintain the simmer.

For the Orange Segments:

For this step you will need 8 oranges. (I used 2 grapefruits and sliced the segments in half)

Cut the oranges into segments over a shallow bowl and make sure to keep the juice. Add the segments to the bowl with the juice.

[See YouTube video in the References section below for additional information on segmenting oranges.]

For the Caramel:

Ingredients U.S. Metric Imperial Instructions for Ingredients granulated sugar 1 cup; 7 oz; 200 grams orange juice 1.5 cups + 2 tablespoons; 14 oz; 400 grams

Place the sugar in a pan on medium heat and begin heating it.

Once the sugar starts to bubble and foam, slowly add the orange juice. As soon as the mixture starts boiling, remove from the heat and pour half of the mixture over the orange segments.

Reserve the other half of the caramel mixture in a small bowl — you will use this later to spoon over the finished dessert. When the dessert is assembled and setting in the freezer, heat the kept caramel sauce in a small saucepan over low heat until it thickens and just coats the back of a spoon (about 10 minutes). You can then spoon it over the orange tians.

[Tip: Be very careful when making the caramel — if you have never made caramel before, I would suggest making this step while you don’t have to worry about anything else. Bubbling sugar is extremely, extremely hot, so make sure you have a bowl of ice cold water in the kitchen in case anyone gets burnt!]

For the Whipped Cream:

Ingredients U.S. Metric Imperial Instructions for Ingredients heavy whipping cream 1 cup; 7 oz; 200 grams 3 tablespoons of hot water 1 tsp Gelatine 1 tablespoon of confectioner's sugar orange marmalade (see recipe above) 1 tablespoon

In a small bowl, add the gelatine and hot water, stirring well until the gelatine dissolves. Let the gelatine cool to room temperature while you make the whipped cream. Combine the cream in a chilled mixing bowl. Whip the cream using a hand mixer on low speed until the cream starts to thicken for about one minute. Add the confectioner sugar. Increase the speed to medium-high. Whip the cream until the beaters leave visible (but not lasting) trails in the cream, then add the cooled gelatine slowly while beating continuously. Continue whipping until the cream is light and fluffy and forms soft peaks. Transfer the whipped cream to a bowl and fold in the orange marmalade.

[Tip: Use an ice cold bowl to make the whipped cream in. You can do this by putting your mixing bowl, cream and beater in the fridge for 20 minutes prior to whipping the cream.]

Assembling the Dessert:

Make sure you have some room in your freezer. Ideally, you should be able to fit a small baking sheet or tray of desserts to set in the freezer.

Line a small tray or baking sheet with parchment paper or a silicone sheet. Lay out 6 cookie cutters onto the parchment paper/silicone.

Drain the orange segments on a kitchen towel.

Have the marmalade, whipped cream and baked circles of dough ready to use.

Arrange the orange segments at the bottom of each cookie cutter. Make sure the segments all touch either and that there are no gaps. Make sure they fit snuggly and look pretty as they will end up being the top of the dessert. Arrange them as you would sliced apples when making an apple tart.

Once you have neatly arranged one layer of orange segments at the bottom of each cookie cutter, add a couple spoonfuls of whipped cream and gently spread it so that it fills the cookie cutter in an even layer. Leave about 1/4 inch at the top so there is room for dough circle.

Using a butter knife or small spoon, spread a small even layer of orange marmalade on each circle of dough.

Carefully place a circle of dough over each ring (the side of dough covered in marmalade should be the side touching the whipping cream). Gently press on the circle of dough to make sure the dessert is compact.

Place the desserts to set in the freezer to set for 10 minutes.

Using a small knife, gently go around the edges of the cookie cutter to make sure the dessert will be easy to unmold. Gently place your serving plate on top of a dessert (on top of the circle of dough) and turn the plate over. Gently remove the cookie cutter, add a spoonful of caramel sauce and serve immediately.

February 24, 2010

Daring Bakers - Tirimisu

Groan.... I have to make it entirely from scratch? Yes, that is what the challenge says, so I read it again and it said the same thing. At the beginning of the month, I was pretty pumped up. I thought making this dessert from scratch (a 2-3 day process) sounded like a really intense challenge I was up for. Towards the end of the month when I actually started the recipe... and realized how long it was going to take... I lost a little of that adrenaline (if you could call it that).

The February 2010 Daring Bakers’ challenge was hosted by Aparna of My Diverse Kitchen and Deeba of Passionate About Baking. They chose Tiramisu as the challenge for the month. Their challenge recipe is based on recipes from The Washington Post, Cordon Bleu at Home and Baking Obsession.

I started with the Mascarpone Cheese. I have been interested in making a cheese at home since reading Barbara Kingsolver's novel, Animal Vegetable Miracle where she describes this process in detail (and makes you believe you can do it too). The directions for the Mascarpone were not the most descriptive. Maybe I expected too much since making cheese seems so much more scientific than heating heavy cream with lemon juice until it becomes thick like custard. Apparently not. I did struggle to get the cream to a high enough temperature (I later learned that many DBers had the same problem and that you should use stainless steel in the double boiler) and although it was a good thing to try once, I think I would rather just buy it from the store.

Night numero dos, I made the Zabaglione. I didn't feel like buying a bottle of Marsala (sweet wine kind of like port) and used coffee instead. Again, it took a lot longer than the suggest 8 minute time frame to get this to custard consistency. [insert grumbling about making this from scratch].
Day three. I need a break. Hosting dinner for a small group. Stare into the fridge and check on the Zabaglione and cheese. looks good. I've only eaten Tiramisu about three times in my life (never while I was living in Italy) and each of those times, it was so so. Maybe I lost my ambition, maybe I remembered how uninteresting Tiramisu was, mostly I just started running out of nights. I bought store bought Savoiarde. They are imported from Italia (justification) and I would have been late with the challenge if I hadn't. I was supposed to make the cookies from scratch, but this challenge was really about getting back in the swing of things. It had been a long time since participating in a DB challenge, so cheating a little on this one is good - or else I may have given up.
Day Four. Pastry Cream, Whipped Cream, Assembly. Pastry cream is another of the finicky stove top heating procedures that can make or break a delicate cream. If you heat it too fast, the egg yolk will curdle, too slow, and you're standing over the stove entirely too long. Mine turned out fine. Whipping cream is always a fun event. The mixer gets to do all the work while you monitor for consistency. Stiff peaks. I prepared the cookie dunking liquid and folded the cream together with my home made Mascarpone (which is actually good) and Zabaglione.
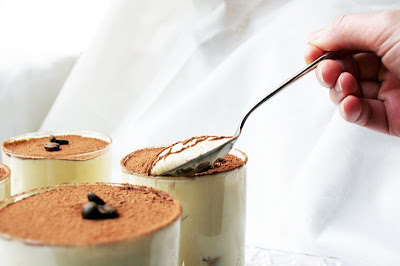
I decided using glasses as my vessel was prettier than the blob that might have happened if I tried it free form. 1 1/2 cookies for each layer with a bit of the cream on top. Dusted with cocoa powder they look so magnificent. I really enjoyed this recipe after tasting it. It was not overpowered by coffee, and I omitted the rum extract, so the mild vanilla/lemon flavors came through nicely. I'm not sure I would go to the trouble of making this again unless I met someone who absolutely adored Tiramisu (and needed one for their birthday).
Mascarpone Cheese
Click the link above for the recipe!

Recipe from Cordon Bleu at Home

This recipe makes approximately 24 big ladyfingers or 45 small (2 1/2" to 3" long) ladyfingers.

Ingredients: 3 eggs, separated 6 tablespoons /75gms granulated sugar 3/4 cup/95gms cake flour, sifted (or 3/4 cup all purpose flour + 2 tbsp corn starch) 6 tablespoons /50gms confectioner's sugar,

Method:

Preheat your oven to 350 F (175 C) degrees, then lightly brush 2 baking sheets with oil or softened butter and line with parchment paper. Beat the egg whites using a hand held electric mixer until stiff peaks form. Gradually add granulate sugar and continue beating until the egg whites become stiff again, glossy and smooth.

In a small bowl, beat the egg yolks lightly with a fork and fold them into the meringue, using a wooden spoon. Sift the flour over this mixture and fold gently until just mixed. It is important to fold very gently and not overdo the folding. Otherwise the batter would deflate and lose volume resulting in ladyfingers which are flat and not spongy. Fit a pastry bag with a plain tip (or just snip the end off; you could also use a Ziploc bag) and fill with the batter. Pipe the batter into 5" long and 3/4" wide strips leaving about 1" space in between the strips.

Sprinkle half the confectioner's sugar over the ladyfingers and wait for 5 minutes. The sugar will pearl or look wet and glisten. Now sprinkle the remaining sugar. This helps to give the ladyfingers their characteristic crispness.

Hold the parchment paper in place with your thumb and lift one side of the baking sheet and gently tap it on the work surface to remove excess sprinkled sugar. Bake the ladyfingers for 10 minutes, then rotate the shee

ts and bake for another 5 minutes or so until the puff up, turn lightly golden brown and are still soft.

Allow them to cool slightly on the sheets for about 5 minutes and then remove the ladyfingers from the baking sheet with a metal spatula while still hot, and cool on a rack. Store them in an airtight container till required. They should keep for 2 to 3 weeks.

Tiramisu

(Recipe source: Carminantonio's Tiramisu from The Washington Post) This recipe makes 6 servings

For the Zabaglione: 2 large egg yolks 3 tablespoons sugar/50gms 1/4 cup/60ml Marsala wine (or port or coffee) 1/4 teaspoon/ 1.25ml vanilla extract 1/2 teaspoon finely grated lemon zest

Heat water in a double boiler. If you don’t have a double boiler, place a pot with about an inch of water in it on the stove. Place a stainless bowl in the pot making sure the bottom does not touch the water. In a large mixing bowl (or stainless steel mixing bowl), mix together the egg yolks, sugar, the Marsala (or espresso/ coffee), vanilla extract and lemon zest. Whisk together until the yolks are fully blended and the mixture looks smooth. Transfer the mixture to the top of a double boiler or place your bowl over the pan/ pot with simmering water. Cook the egg mixture over low heat, stirring constantly, for about 8 minutes or until it resembles thick custard. It may bubble a bit as it reaches that consistency.

Let cool to room temperature and transfer the zabaglione to a bowl. Cover and refrigerate at least 4 hours or overnight, until thoroughly chilled.

For the Vanilla Pastry Cream:1/4 cup/55gms sugar 1 tablespoon/8gms all purpose flour 1/2 teaspoon finely grated lemon zest 1/2 teaspoon/ 2.5ml vanilla extract 1 large egg yolk 3/4 cup/175ml whole milk

Mix together the sugar, flour, lemon zest and vanilla extract in a medium heavy-bottomed saucepan. To this add the egg yolk and half the milk. Whisk until smooth. Now place the saucepan over low heat and cook, stirring constantly to prevent the mixture from curdling.

Add the remaining milk a little at a time, still stirring constantly. After about 12 minutes the mixture will be thick, free of lumps and beginning to bubble. (If you have a few lumps, don’t worry. You can push the cream through a fine-mesh strainer.)

Transfer the pastry cream to a bowl and cool to room temperature. Cover with plastic film and refrigerate at least 4 hours or overnight, until thoroughly chilled.

For the Whipped Cream: 1 cup/235ml chilled heavy cream (we used 25%) 1/4 cup/55gms sugar 1/2 teaspoon/ 2.5ml vanilla extract

Combine the cream, sugar and vanilla extract in a mixing bowl. Beat with an electric hand mixer or immersion blender until the mixture holds stiff peaks. Set aside.

To assemble the Tiramisu: 2 cups/470ml brewed espresso, warmed 1 teaspoon/5ml rum extract (optional) 1/2 cup/110gms sugar 1/3 cup/75gms mascarpone cheese36 savoiardi/ ladyfinger biscuits (you may use less) 2 tablespoons/30gms unsweetened cocoa powder

To assemble the tiramisu: Have ready a rectangular serving dish (about 8" by 8" should do) or one of your choice. Mix together the warm espresso, rum extract and sugar in a shallow dish, whisking to mix well. Set aside to cool.

In a large bowl, beat the mascarpone cheese with a spoon to break down the lumps and make it smooth. This will make it easier to fold. Add the prepared and chilled zabaglione and pastry cream, blending until just combined. Gently fold in the whipped cream. Set this cream mixture aside.

Now to start assembling the tiramisu. Workings quickly, dip 12 of the ladyfingers in the sweetened espresso, about 1 second per side. They should be moist but not soggy. (If you use store bought cookies dip as fast as you can and let a little of the liquid drain out before placing them in the dish). Immediately transfer each ladyfinger to the platter, placing them side by side in a single row. You may break a lady finger into two, if necessary, to ensure the base of your dish is completely covered. Spoon one-third of the cream mixture on top of the ladyfingers, then use a rubber spatula or spreading knife to cover the top evenly, all the way to the edges. Repeat to create 2 more layers, using 12 ladyfingers and the cream mixture for each layer. Clean any spilled cream mixture; cover carefully with plastic wrap and refrigerate the tiramisu overnight. To serve, carefully remove the plastic wrap and sprinkle the tiramisu with cocoa powder using a fine-mesh strainer or decorate as you please. Cut into individual portions and serve.

Thanks M for snapping some of these lovely shots!

January 1, 2010

My Top Ten of 2009

Today is the first day of 2010, so Happy New Year to you all. I thought today would be a good day to reflect on the past year of my blog and I have decided to recount my top ten recipes. Before we reflect, I'm going to tell you all about my baking plans for this year, resolution style. I don't typically make resolutions because they tend to get shoved aside or are so unrealistic that they are on the skirts of achievability. Food related resolutions are new for me and definitely attainable. Do you all have resolutions for the new year?


I'm going to attempt to use more whole wheat flour. Not so much for health reasons, mostly because I tend to run out of all purpose flour all of the time and the whole wheat bag sits in the cupboard feeling unwanted and depressed. If I had a repertoire of more whole wheat recipes I would definitely cook with it more often.


I'm going to try hard and not skip the Daring Bakers Challenges for the whole year. This will require me to plan ahead, not procrastinate, and make some items I don't like. It is difficult when you know the recipe at the beginning of the month and don't have to post something until the very end. I might have to make up more reasons to celebrate with baked goods during the month.


I am going to make more bread. Plain and simple. I can't really say quantity-wise what "more" is equal to, I'm just going to make more of it. I have a lot of great cookbooks at my fingertips and I enjoy bread a lot. (I believe I've mentioned before bread is one of my favorite smells). It would also be nice to have more home made bread with dinners or lunches. I'm not limiting myself to just hand made either, I'll bring my bread machine to this challenge too. 


I am going to post at least one non baking item each month. M and I cook a lot and I think some of these meals you might enjoy too. We have a plethora of food delivered to us twice a month from our local CSA and we cook with it each week, so why not share it too? After all, people who read this might not have the itch to bake quite as often as I do.


I would like to celebrate food more. This means all of you in San Fran might gain a few pounds with me. In an effort to appreciate the Slow Food Movement, and because M and I like to host dinners, I want to have people over more often for food. Cooking and eating together, good wine, what more could you ask for? (I haven't discussed this one with M yet, but I'm pretty sure he will be ok with it).


I think this is enough resolutions for now, I'll let you know if I come up with more later. Now, on with this recap of my favorites from '09. (What do we call 10 by the way? It seems so awkward without the "O" in front of it). Here they are in random order.


Savory Puff Pastry

I enjoyed this Challenge for Daring Bakers. We made puff pastry from scratch (which I may never do again) and I came up with this savory topping. I absolutely loved them. You can make it store bought pastry but I definitely recommend trying the filling. 


Wedding Cake

Making a wedding cake is one of the highlights of my year. The challenge of it was unreal. I would love to make another if the opportunity presents itself. 


Four Cheesecakes

I like cheesecake. I don't make it often because it is so terrible for you (though most of the desserts I make are not "good" for you) so I made the most of it using 4" mini spring-form pans. They were so cute and tasty. I'd definitely make some of them again. 


Cookie Cake Tower

Who would not like a three layer cookie cake for their birthday? I chose this one because I felt it was creative and good. Not to forget it traveled from California to Virginia in one piece! 


French Style Bread

Bread, one of the techniques I attempted to master this year. I can't say I am a master yet (hence the resolution to continue making more of it this year) but one day I might make bread like my dad numero dos. This french loaf was one of M's favorites his dad made growing up, and I wanted to continue the traditions. It makes two loaves so you can save one for later or feed a lot of people. 


Carrot Muffins

Are you wondering why there is a picture of carrots here? It is because carrot muffins come from my early days of the blog when I was not obsessed with taking photos of food (or they were so good we ate them all before I could snap a shot). I didn't post the recipe in my original post so you are welcome to view it here


Frozen Lime Pie

Not only was this a wonderful dessert, it brings back lovely memories of the Grenadines. After a week of sailing we relaxed at one of the most beautiful houses on St Lucia. Check out these amazing pictures by M. Then be sure to check out the website for the house if you feel like taking an extravagant vacation (pictures on the website do not do it justice). The house comes with the chef and two other house staff (one of which created this recipe). She also makes amazing curry chicken and mahi mahi. I'd like to be there right now. 


Walnut Ice Cream with Tomato Caramel Sauce

This recipe was inspired by my desire to make our plethora of tomatoes into a dessert. It worked, it just was not as literal as eating a tomato for dessert. Hidden in a caramel sauce the tomato gave a new depth of flavor to this amazingly creamy ice cream. If you have the supplies I recommend trying it. 


Mini Fruit Pizzas

I used to make this dessert a lot. I changed the recipe a little bit most recently and enjoyed it more than usual, especially served cold. A crowd pleaser when fresh berries are in season. 


Cornbread

One of M's favorites. It accompanies soups, jambalaya, gumbo, fish, and whatever else we can create to go with it. I think it would go wonderful with a new recipe I came across Pumpkin Turkey Chili. Give it a try, you won't even know the pumpkin is in there. We like it so much I sometimes think we choose recipes just so we have an excuse to make it. A good reason to keep buttermilk on hand at all times. 

September 26, 2009

Daring Bakers - Vols-al-Vent

Do you speak french? Well I don't, it seems to be the hardest language for me to mimic. I've got Italian and Spanish down but not French. I need a little work. Vols au Vent is a noun that means something like "puff paste shell with a savory meat mixture". As much as I love savory meat ragouts I didn't want to stick to the literal translation. Instead I decided to go with a version of the suggested translation, "After one Bite I could die and go to heaven," and devise a sweet creation that seemed to fit "heavenly dessert." I also decided to try a savory puff though it has nothing to do with meat.

The September 2009 Daring Bakers' challenge was

hosted by Steph of A Whisk and a Spoon. She chose the French treat, Vols-au-Vent based on the Puff Pastry recipe by Michel Richard from the cookbook Baking With Julia by Dorie Greenspan.

Puff Pastry.

After I ran away screaming I thought it best to come back prepared to tackle this dreaded delicacy. Most home chefs will not make this for themselves - it takes too much time and is quite finicky. I am one of those chefs (or bakers in my case) and I actually dreaded making this pastry for the month of September. I decided to save Saturday the 26th for Pastry day since the recipe suggests that it might just take 5 hours to make. If I had a cold marble slab (as my Aunt Joy suggested at dinner the other night) I might have been able to cut out the chilling time... I didn't do so bad though. From start to finish I managed to only need 3.5 hours total! Including the time I needed to make the fillings.

I kept the filling simple. Roasted Figs with Honey and Mascarpone Cheese, and my savory treat was Roasted Tomatoes with Caramelized Onion, Feta, Goat Cheese and Thyme. I have had some figs frozen from my produce box before my Hawaii trip. I decided this was the perfect occasion. And although I would have enjoyed making these with fresh figs, roasting them with honey made them delicious and it was quick and simple.

I actually ended up loving the savory pastry much more than the figs. Not that the fig was bad, but the tomato dish had much more depth of flavor. The caramelized onions were a must. If I make this again I will definitely just do the savory filling instead of dessert filling. For the construction of the pastries I used two base layers and two wall layers. I don't have a biscuit cutter (I know crazy... I should probably just buy one) so I made them square. I think the sides would have risen better if I had a sharper knife as well but they did just fine with my sharp pizza cutter. It was fun and not as scary as I thought to make this puff pastry. It took more time than skill - even though I was nervous about rolling a rectangle perfectly. Puff pastry is filled with so much butter that the taste is good too. All those layers of fat trapped in the dough making pockets of puffed air. Delicious. I might make it easier on myself next time and just make a long rectangle and add fillings to cut in squares later, but the little tarts were beautiful. If you are not into making your own pastry, I hope you try the savory filling with store bought pastry, it was so good!

Roasted Figs with Honey and Mascarpone Cheese

1 fig per tart halved

1 T honey (per 3 figs)

Preheat oven to 350˚. Toss figs with honey to coat. Roast in the oven 8 minutes stirring half way through. Allow to cool. Place on top of finished puff pastry and add a dollop of mascarpone cheese. Drizzle some honey on top.

Roasted Tomato and Cheese Tarts

Goat Cheese

Tomato slices 1/4" thick

1/3 C onion sliced thin and separated - caramelize over low heat with a tiny bit of butter

Thyme

Feta Cheese

Roast the tomato slices in a 400˚ oven until edges start to brown (about 20 minutes). Smear some goat cheese on top of the finished puff pastry. Stack two layers of tomato for each tart (I used yellow tomatoes and red tomatoes). Then add about a tablespoon of caramelized onion on top. Sprinkle with crumbled feta and fresh thyme.

Both were best warmed before serving (just try not to melt your mascarpone cheese or it becomes difficult to eat!)

Puff Pastry

from Baking with Julia by Dorie Greenspan Yield: 2-1/2 pounds dough Steph’s note: This recipe makes more than you will need for the quantity of vols-au-vent. While I encourage you to make the full recipe of puff pastry, as extra dough freezes well, you can halve it successfully if you’d rather not have much leftover.

Prep Times: -about 4-5 hours to prepare the puff pastry dough (much of this time is inactive, while you wait for the dough to chill between turns…it can be stretched out over an even longer period of time if that better suits your schedule) -about 1.5 hours to shape, chill and bake the vols-au-vent after your puff pastry dough is complete

Equipment: -food processor (will make mixing dough easy, but I imagine this can be done by hand as well) -rolling pin -pastry brush -metal bench scraper (optional, but recommended) -plastic wrap -baking sheet -parchment paper -silicone baking mat (optional, but recommended) -set of round cutters (optional, but recommended) -sharp chef’s knife -fork -oven -cooling rack

Ingredients: 2-1/2 cups (12.2 oz/ 354 g) unbleached all-purpose flour 1-1/4 cups (5.0 oz/ 142 g) cake flour 1 tbsp. salt (you can cut this by half for a less salty dough or for sweet preparations) 1-1/4 cups (10 fl oz/ 300 ml) ice water 1 pound (16 oz/ 454 g) very cold unsalted butter

plus extra flour for dusting work surface

Mixing the Dough:

Check the capacity of your food processor before you start. If it cannot hold the full quantity of ingredients, make the dough into two batches and combine them.

Put the all-purpose flour, cake flour, and salt in the work bowl of a food processor fitted with a metal blade and pulse a couple of times just to mix. Add the water all at once, pulsing until the dough forms a ball on the blade. The dough will be very moist and pliable and will hold together when squeezed between your fingers. (Actually, it will feel like Play-Doh.)

Remove the dough from the machine, form it into a ball, with a small sharp knife, slash the top in a tic-tac-toe pattern. Wrap the dough in a damp towel and refrigerate for about 5 minutes.

Meanwhile, place the butter between 2 sheets of plastic wrap and beat it with a rolling pin until it flattens into a square that's about 1" thick. Take care that the butter remains cool and firm: if it has softened or become oily, chill it before continuing.

Incorporating the Butter:

Unwrap the dough and place it on a work surface dusted with all-purpose flour (A cool piece of marble is the ideal surface for puff pastry) with your rolling pin (preferably a French rolling pin without handles), press on the dough to flatten it and then roll it into a 10" square. Keep the top and bottom of the dough well floured to prevent sticking and lift the dough and move it around frequently. Starting from the center of the square, roll out over each corner to create a thick center pad with "ears," or flaps.

Place the cold butter in the middle of the dough and fold the ears over the butter, stretching them as needed so that they overlap slightly and encase the butter completely. (If you have to stretch the dough, stretch it from all over; don't just pull the ends) you should now have a package that is 8" square.

To make great puff pastry, it is important to keep the dough cold at all times. There are specified times for chilling the dough, but if your room is warm, or you work slowly, or you find that for no particular reason the butter starts to ooze out of the pastry, cover the dough with plastic wrap and refrigerate it . You can stop at any point in the process and continue at your convenience or when the dough is properly chilled.

Making the Turns:

Gently but firmly press the rolling pin against the top and bottom edges of the square (this will help keep it square). Then, keeping the work surface and the top of the dough well floured to prevent sticking, roll the dough into a rectangle that is three times as long as the square you started with, about 24" (don't worry about the width of the rectangle: if you get the 24", everything else will work itself out.) With this first roll, it is particularly important that the butter be rolled evenly along the length and width of the rectangle; check when you start rolling that the butter is moving along well, and roll a bit harder or more evenly, if necessary, to get a smooth, even dough-butter sandwich (use your arm-strength!).

With a pastry brush, brush off the excess flour from the top of the dough, and fold the rectangle up from the bottom and down from the top in thirds, like a business letter, brushing off the excess flour. You have completed one turn.

Rotate the dough so that the closed fold is to your left, like the spine of a book. Repeat the rolling and folding process, rolling the dough to a length of 24" and then folding it in thirds. This is the second turn.

Chilling the Dough:

If the dough is still cool and no butter is oozing out, you can give the dough another two turns now. If the condition of the dough is iffy, wrap it in plastic wrap and refrigerate it for at least 30 minutes. Each time you refrigerate the dough, mark the number of turns you've completed by indenting the dough with your fingertips. It is best to refrigerate the dough for 30 to 60 minutes between each set of two turns.

The total number of turns needed is six. If you prefer, you can give the dough just four turns now, chill it overnight, and do the last two turns the next day. Puff pastry is extremely flexible in this regard. However, no matter how you arrange your schedule, you should plan to chill the dough for at least an hour before cutting or shaping it.

Forming and Baking the Vols-au-Vent

Yield: 1/3 of the puff pastry recipe below will yield about 8-10 1.5” vols-au-vent or 4 4” vols-au-vent

In addition to the equipment listed above, you will need: -well-chilled puff pastry dough (recipe below) -egg wash (1 egg or yolk beaten with a small amount of water) -your filling of choice

Line a baking sheet with parchment and set aside.

Using a knife or metal bench scraper, divided your chilled puff pastry dough into three equal pieces. Work with one piece of the dough, and leave the rest wrapped and chilled. (If you are looking to make more vols-au-vent than the yield stated above, you can roll and cut the remaining two pieces of dough as well…if not, then leave refrigerated for the time being or prepare it for longer-term freezer storage. See the “Tips” section below for more storage info.)

On a lightly floured surface, roll the piece of dough into a rectangle about 1/8 to 1/4-inch (3-6 mm) thick. Transfer it to the baking sheet and refrigerate for about 10 minutes before proceeding with the cutting. (This assumes you will be using round cutters, but if you do not have them, it is possible to cut square vols-au-vents using a sharp chef’s knife.) For smaller, hors d'oeuvre sized vols-au-vent, use a 1.5” round cutter to cut out 8-10 circles. For larger sized vols-au-vent, fit for a main course or dessert, use a 4” cutter to cut out about 4 circles. Make clean, sharp cuts and try not to twist your cutters back and forth or drag your knife through the dough. Half of these rounds will be for the bases, and the other half will be for the sides. (Save any scrap by stacking—not wadding up—the pieces…they can be re-rolled and used if you need extra dough. If you do need to re-roll scrap to get enough disks, be sure to use any rounds cut from it for the bases, not the ring-shaped sides.)

Using a ¾-inch cutter for small vols-au-vent, or a 2- to 2.5-inch round cutter for large, cut centers from half of the rounds to make rings. These rings will become the sides of the vols-au-vent, while the solid disks will be the bottoms. You can either save the center cut-outs to bake off as little “caps” for you vols-au-vent, or put them in the scrap pile.

Dock the solid bottom rounds with a fork (prick them lightly, making sure not to go all the way through the pastry) and lightly brush them with egg wash. Place the rings directly on top of the bottom rounds and very lightly press them to adhere. Brush the top rings lightly with egg wash, trying not to drip any down the sides (which may inhibit rise). If you are using the little “caps,” dock and egg wash them as well.

Refrigerate the assembled vols-au-vent on the lined baking sheet while you pre-heat the oven to 400ºF (200ºC). (You could also cover and refrigerate them for a few hours at this point.)

Once the oven is heated, remove the sheet from the refrigerator and place a silicon baking mat (preferred because of its weight) or another sheet of parchment over top of the shells. This will help them rise evenly. Bake the shells until they have risen and begin to brown, about 10-15 minutes depending on their size. Reduce the oven temperature to 350ºF (180ºC), and remove the silicon mat or parchment sheet from the top of the vols-au-vent. If the centers have risen up inside the vols-au-vent, you can gently press them down. Continue baking (with no sheet on top) until the layers are golden, about 15-20 minutes more. (If you are baking the center “caps” they will likely be finished well ahead of the shells, so keep an eye on them and remove them from the oven when browned.)

Remove to a rack to cool. Cool to room temperature for cold fillings or to warm for hot fillings.

Fill and serve.

*For additional rise on the larger-sized vols-au-vents, you can stack one or two additional ring layers on top of each other (using egg wash to "glue"). This will give higher sides to larger vols-au-vents, but is not advisable for the smaller ones, whose bases may not be large enough to support the extra weight.

*Although they are at their best filled and eaten soon after baking, baked vols-au-vent shells can be stored airtight for a day.

*Shaped, unbaked vols-au-vent can be wrapped and frozen for up to a month (bake from frozen, egg-washing them first).

you might also like...

Related Posts Plugin for WordPress, Blogger...